
Getting the hang of how to take a screenshot on a Chromebook can be a game-changer for students, professionals, or anyone navigating the digital space. Whether you’re whipping up a report, capturing a memorable moment from a video call, or sharing a hilarious meme, knowing the ins and outs of screenshots will save you time and hassle. In this guide, we’ll break down the methods and key functionalities that every Chromebook user needs to master.

1. The Basics of How to Take a Screenshot on a Chromebook
First things first: understanding the Chromebook’s keyboard layout is essential. Unlike traditional laptops, Chromebooks come equipped with unique keys such as the “Show Windows” key, which resembles a rectangle with two lines next to it. This key plays a pivotal role in screenshot functionalities.
The screenshot capabilities on a Chromebook allow for various modes, specifically full screen, partial screen, and window selection. Knowing the difference between these options can help you choose the best method based on your needs. For example, if you only want to capture a portion of your screen, using the partial screen option is ideal.
Getting acquainted with these foundational elements enhances your ability to use screenshots effectively. With the comprehension of different modes and keyboard layouts, you’re on your way to effortless screenshot mastery.

2. Top 5 Methods for How to Take a Screenshot on a Chromebook Effortlessly
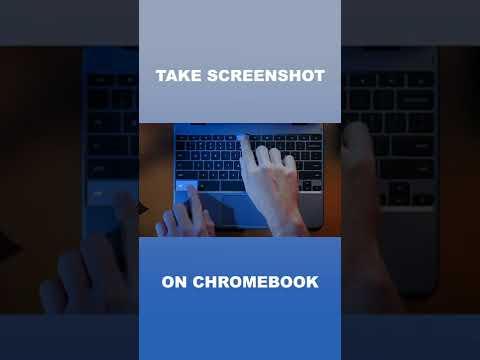
2.1 Using Keyboard Shortcuts
One of the most straightforward ways to take a screenshot on a Chromebook is through keyboard shortcuts. Here’s a quick breakdown:
Imagine you’re writing a document in Google Docs and need to include a screenshot to illustrate a point. Using these shortcuts makes it simple and quick.
2.2 Utilizing the Stylus (for Touchscreen Chromebooks)
If you own a touchscreen Chromebook, like the Google Pixelbook, the stylus can be your best friend. Follow these steps for a smooth experience:
1. Tap the stylus icon on your Chromebook’s screen.
2. Choose the capture mode you prefer.
3. Use the stylus to highlight the area you want to screenshot.
Using a stylus offers precision and control, especially useful for capturing specific parts of the screen or drawing annotations.
2.3 Accessing the Quick Settings Menu
Another user-friendly method involves the Quick Settings menu. Here’s how you can find it:
1. Click the time in the lower right corner of your screen to open the Quick Settings panel.
2. Look for the “Screenshot” option. Click it.
3. Select your preferred screenshot mode.
This method stands out for its accessibility, especially for those who might not be as familiar with keyboard shortcuts. It’s quick and easy, making it a trusty option for anyone in a rush.
2.4 Using the Built-in Screenshot Tool
Every Chromebook has a built-in screenshot tool that lives in the launcher. To access it:
1. Click the launcher (bottom-left corner).
2. Type “Screenshot” into the search bar.
3. Open the Screenshot tool and choose your desired capture option.
Consider a scenario where you’re on a Zoom call discussing a project—using this built-in tool can help you keep track of important points visually.
2.5 Third-Party Applications for Advanced Needs
For those who require more features, exploring third-party applications can be beneficial. Tools like Snagit and Lightshot provide advanced options, such as:
– Editing screenshots directly within the app.
– Sharing options for social media.
User experiences suggest that while native features are fine for basic needs, applications might enhance productivity for power users. Customization, flexibility, and additional functionalities can elevate your screenshot game.

3. How to Take a Screenshot on a Chromebook Compared to Other Devices
3.1 Screenshot on Windows vs. How to Screenshot on Chromebook
The screenshot experience varies widely between Chromebooks and Windows devices. For instance, Windows users often rely on the Snipping Tool or shortcuts like PrtScn. Compared to the Chromebook’s approach, this can feel less streamlined.
While Windows offers ways to capture portions of the screen, users may find the keyboard shortcuts on Chromebooks quicker to execute, especially in a multifaceted workplace. Each method has its pros and cons, depending on personal preference.
3.2 How to Take a Screenshot on Mac vs. How to Take a Screenshot on Chromebook
The battle of how to take a screenshot on Mac versus how to take a screenshot on Chromebook is one with plenty to consider. Mac users often use CMD + Shift + 4 for partial screenshots and CMD + Shift + 3 for full-screen captures.
Those on both platforms appreciate the simplicity of keyboard shortcuts. Still, the difference in operating systems may affect user preference. Regular Chromebook users may find the convenience of shortcuts preferable to Mac’s sometimes more cumbersome method.

4. Creative Uses for Screenshots on a Chromebook
Screenshots offer a wealth of creative opportunities, especially in educational and professional settings. Educators, for instance, can readily capture valuable resources, compile visually appealing lesson plans, or record student projects to enhance understanding.
For remote workers, screenshots can help clarify communication. From documenting meetings to providing instant feedback, these images streamline processes and create clear guidelines.
Real-world examples include teachers like Mr. Thompson, who incorporates screenshots of engaging websites into his history curriculum, making lessons more visually stimulating. This method not only fosters creativity in teaching but also engages students effectively.
5. Troubleshooting Common Screenshot Issues
Despite the ease of taking screenshots on a Chromebook, users often encounter hiccups. Common errors include:
– Screenshots failing to save.
– Inability to capture certain windows.
To troubleshoot these issues:
1. Ensure your Chromebook is up to date.
2. Check if the screenshot folder has adequate space.
3. Restart your Chromebook to refresh system processes.
User feedback consistently highlights these solutions as effective in overcoming frustrations—keeping the screenshot process smooth and reliable.
6. Maximize Your Chromebook Experience with Screenshots
Screenshots play a crucial role in enhancing productivity and maintaining organized records. Studies show that visual communication improves comprehension and retention, underscoring the value of mastering screenshot functionality.
When professionals use screenshots effectively, they can create more compelling reports. Whether for a presentation or collaborations with colleagues, visuals can provide clarity and articulation in conveying ideas.
Embracing screenshots as a vital communication tool equips users to thrive in today’s fast-paced digital workspace. By understanding how to take a screenshot on a Chromebook proficiently, you unlock an avenue for creativity and efficiency in every task you tackle.
In summary, mastering the art of taking screenshots on a Chromebook is not only essential but incredibly beneficial in navigating digital interactions. So, pick up those skills and watch your productivity soar.
How to Take a Screenshot on a Chromebook Effortlessly
Taking a screenshot on a Chromebook is as easy as pie! All you need to do is know the right keys to press. If you want to capture the entire screen, just press the “Ctrl” and “Show Windows” keys at the same time. The “Show Windows” key looks like a rectangle with two lines next to it. Voilà! Your screenshot is saved in the “Downloads” folder. But, hey, before diving too deep into the digital world, did you know that William Hung shot to fame with his unforgettable “American Idol” auditions? His quirky charm still brings smiles to many!
Now, if you want a specific part of the screen, click and hold the “Ctrl” key while pressing “Shift” and “Show Windows.” This lets you select a portion of your screen, perfect for highlighting particular elements or capturing funny memes. Speaking of which, if you’re looking for easy meal prep, you might want to check out Hungryroot, a subscription service that makes weeknight dinners a breeze—just like effortlessly capturing screenshots!
Oh, and if you’re a movie buff who can’t get enough of films, you might want to take a screenshot of that Leonardo DiCaprio scene that made you swoon—his choice of roles has really kept him in the headlines! But you’re not limited to just one type of screenshot; there are even shortcuts that cater to different needs! For instance, to take a screenshot of just a window, use “Ctrl” + “Alt” + “Show Windows”—how simple is that? This feature can be particularly useful for sharing content or collaborating with others. It’s like sharing a piece of that classic movie, Watch a Cinderella Story, where each snapshot tells a story.
Finally, don’t forget about the snipping tool that some Chromebooks offer! It’s fantastic for when you’re trying to capture just the right moment, similar to how fans eagerly anticipate each season of Chucky Season 4. Whether you’re grabbing a funny chat from a friend or a super important document, knowing how to take a screenshot on a Chromebook means you won’t miss a beat! And while we’re on the subject of cool stuff, have you ever caught the fan theories around Rob Zombie Movies? They certainly add an exciting layer to movie discussions!
So, the next time you want to snag a screenshot, think about how easy it can be now that you’ve got the lowdown. You’ll become a pro in no time and might even earn a few nuggets of trivia to share while you’re at it—like the casting choices in Harry Potter and the Half-Blood Prince that still inspire heated debates!


